

 English
 русский
 中文简体
中文简体 Español

How to Properly Maintain MTD High Lift Blades for Longevity and Optimal Performance?
May 08, 2026
In the realm of precision turf management, the cutting implement mounted beneath a lawn tractor or walk-behind mower is often the undervalued component. Among the various geometries available, the MTD high lift blade stands out as a critical tool for operators demanding grass discharge and bagging efficiency. However, even the robust blade will succumb to wear, imbalance, and corrosion without systematic care. Proper maintenance is not merely about periodic sharpening; it is a holistic regimen that preserves metallurgical integrity, ensures rotational balance, and maximizes airflow generation.
Understanding the Functional Anatomy of the Blade
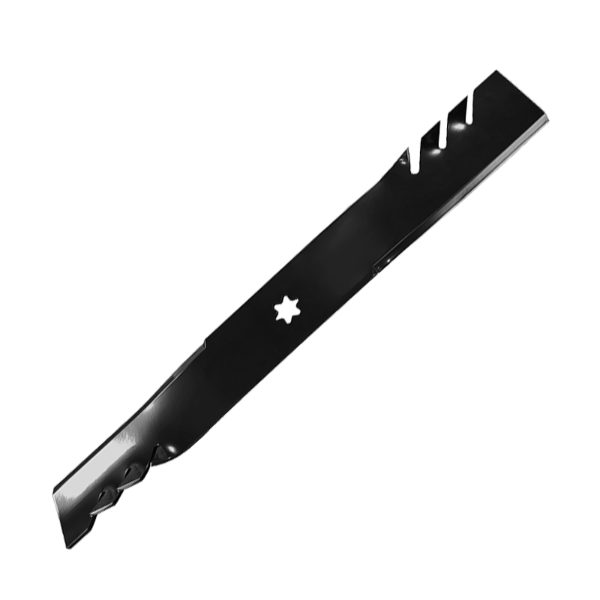
Before delving into maintenance procedures, it is essential to comprehend why an MTD high lift blade requires distinctive handling compared to standard low-lift or mulching blades. The defining characteristic is the pronounced curved wing or upturned sail at the trailing edge of each blade end. This design actively draws air upward, generating significant lift that propels grass clippings through the mower deck and into the collection system.
A typical MTD high lift blade comprises three functional zones:
- Cutting edge (leading edge): Ground to a specific bevel angle to sever grass cleanly.
- Sail area (trailing upturned wing): Creates the vacuum effect; highly susceptible to deformation upon impact with hard objects.
- Center mounting hole with star pattern or round hole: Transfers rotational torque from the spindle; any wear here introduces dangerous vibration.
Understanding this anatomy explains why generic sharpening techniques often fail. Over-grinding the sail area or thinning the cutting edge beyond specification will permanently degrade performance.
Pre-Maintenance Safety Protocol
Safety must be non-negotiable. An MTD high lift blade stores kinetic energy even after engine shutdown. Before any maintenance:
Disconnect the spark plug wire and secure it away from the terminal.
Drain the fuel tank or run the engine dry (for transport gearboxes).
Wear cut-resistant gloves and safety glasses—blade edges may have invisible micro-serrations.
Use a blade removal tool or a wooden block to lock the blade against the deck housing.
Never rely on friction or hand-holding during nut/bolt loosening.
Step 1: Scheduled Removal and Initial Inspection
Frequency: Every 25 operating hours or immediately after striking a solid obstacle (root, rock, curb).
Remove the blade using a 6-point socket (avoid 12-point sockets which round fasteners). Clean debris from the spindle flange and bolt threads using a wire brush. Now conduct a four-point visual inspection:
| Inspection Zone | What to Look For | Action Threshold |
|---|---|---|
| Cutting edge | Nicks, rolled metal, dullness >1/16 inch | Sharpen or replace |
| Sail wings | Cracks, flattened curvature, missing metal | Replace if deformed |
| Center mounting hole | Oval elongation, wear beyond 2mm of original | Immediate replacement |
| Blade body | Bends, twists, rust pitting through >20% thickness | Replace if bent beyond 10° |
Any crack visible to the naked eye mandates replacement. Welding an MTD high lift blade is never permissible—heat alters tempering and induces catastrophic failure at operating speed (typically 1800–2200 RPM tip speed).
Step 2: Cleaning for Accurate Diagnosis
A blade caked with hydrated grass residue hides damage. Use a putty knife to scrape wet clippings, then apply a biodegradable degreaser. Allow five minutes of dwell time. Power-wash at a 45-degree angle, avoiding direct spray into the center hole to prevent water intrusion into the spindle bearing later.
After cleaning, dry the blade thoroughly. Weigh the blade if a shop scale is available. A factory-spec MTD high lift blade has a defined mass; loss of more than 15 grams from one side indicates uneven wear that cannot be corrected by sharpening.
Step 3: Professional Sharpening Protocols
Sharpening an MTD high lift blade is not about creating a razor edge. Agricultural engineering standards specify a final edge angle between 30 and 35 degrees inclusive. A sharper angle (e.g., 20 degrees) will roll over after 15 minutes of cutting; a duller angle increases grass tear rather than cut.
Recommended tools: A bench grinder with a 36-grit aluminum oxide wheel, or a flat mill file for manual dressing. Avoid angle grinders with cutting discs—they generate excessive heat.
Procedure:
Secure the blade in a vise with soft jaws.
Follow the original factory bevel angle. Do not change the geometry.
Use light passes (maximum 0.5 mm material removal per pass).
Dip the blade in water every three passes to keep the metal below 140°C (too hot to hold continuously). Overheating draws temper, turning the edge brittle.
Sharpen only from the top side of the cutting edge. Never grind the bottom edge.
Remove the same number of passes from both ends to maintain symmetry.
A correctly sharpened MTD high lift blade will cleanly slice a sheet of copy paper but not shave arm hair. That degree of keenness is unnecessary for turf and shortens edge life.
Step 4: The Critical Balancing Step
Imbalance is a major cause of premature spindle failure, vibration-induced blade fatigue, and operator discomfort. After sharpening, an MTD high lift blade almost always becomes heavier on one side due to asymmetric metal removal.
Balancing methods:
Static cone balancer method (most accurate):
Place the center hole onto a magnetic cone. The heavy side will drop. Grind additional material from the heavy side’s cutting edge only—never from the sail. Repeat until the blade remains stationary at any rotated position.
Screwdriver shaft method (field expedient):
Pass a perfectly round, straight screwdriver shank through the center hole. Support both ends on level blocks of equal height. Mark the heavy side. Remove material incrementally.
Acceptable tolerance: No more than a 5-gram weight difference between blade ends. For reference, a standard paper clip weighs about 1 gram.
A balanced MTD high lift blade will produce no more than 0.1 mm/s² of spindle vibration. Excessive vibration will manifest as a vibrating handlebar or an uneven cut pattern (scalping on one side).
Step 5: Correct Reinstallation Torque and Orientation
Misinstallation is surprisingly common. Always note the orientation before removal—the sail wings face upward into the deck housing, toward the grass discharge chute.
| Fastener | Typical Specification | Critical Note |
|---|---|---|
| Center bolt (5/8″ or 15mm) | 50–70 Nm (37–52 ft-lb) | Use a torque wrench; never impact gun |
| Washer (cupped or belleville) | Convex side toward bolt head | Provides spring tension |
| Anti-seize compound | Light coat on threads only | Prevents galvanic corrosion |
| Locking nut (if used) | Replace after third removal | Nylon insert loses grip |
Torque in three incremental stages: 20 Nm, 40 Nm, then final 60 Nm. Under-torquing allows blade movement, oblongs the center hole. Over-torquing stretches the bolt and causes fatigue fracture.
Step 6: Seasonal and Storage Maintenance
An MTD high lift blade is vulnerable to corrosion when the mower is stored for winter or off-season periods. Moisture trapped between the blade and spindle flange creates galvanic cells.
Storage protocol:
- Remove the blade for long-term storage (over 90 days).
- Clean and dry thoroughly.
- Apply a thin film of fluid film or lanolin-based rust inhibitor to the entire blade surface. Do not use heavy grease—it attracts grit.
- Store flat in a dry environment, not on a concrete floor (moisture wicks upward).
- Before spring remounting, wipe off the inhibitor and inspect for any pitting.
For operators using the same blade through a continuous cutting season (weekly use), perform a simplified inspection every 10 hours without removal: listen for rhythmic clanking (indicating a loose bolt) or feel for deck vibration.
Common Mistakes That Reduce Blade Longevity
Even experienced operators commit these errors. Avoid them to preserve your MTD high lift blade:
Sharpening both edges equally – The trailing edge is not a cutting surface; grinding it reduces sail strength.
Using a bench vise without soft jaws – Crimps the blade steel, creating stress risers.
Hitting the blade with a hammer to loosen – Flattens the sail curvature irreversibly.
Reusing deformed lock washers – They lose spring tension after one compression cycle.
Power-washing the blade while mounted on deck – Forces grit into the spindle bearing.
When to Replace Rather Than Maintain
No maintenance regimen can resurrect a blade that has reached its structural limit. Replace your MTD high lift blade immediately when:
- The center hole has worn more than 2 mm in any direction.
- A straight edge placed along the blade’s top surface shows a gap of more than 1 mm (bent blade).
- The sail wings have cracked at the radius where they curve upward.
- The blade has been sharpened more than three times or lost more than 15% of its original width measured from the back edge to the cutting edge.
- Any crack, no matter how small, is visible after cleaning.
Operating beyond these limits transforms the blade from a cutting tool into a projectile. Spindle failures at speed have been known to send blade fragments through deck housings.
Advanced Tip: Edge Hardness Testing
For professional grounds maintenance teams, purchasing a portable Leeb hardness tester (basic models cost under $150) can validate blade temper. A correctly heat-treated MTD high lift blade should measure 45–50 HRC on the Rockwell C scale at the cutting edge. Below 40 HRC indicates soft steel that will dull rapidly; above 55 HRC suggests brittleness and risk of chipping.
Conclusion: Systematic Care Equals Predictable Performance
Maintaining an MTD high lift blade is a disciplined cycle of inspection, cleaning, symmetrical sharpening, precision balancing, and torque-accurate reinstallation. Each step is interdependent—a perfectly sharpened blade that remains unbalanced will destroy the spindle; a balanced blade with a bent sail cannot generate proper lift. By adhering to the 25-hour inspection interval, using water-cooling during grinding, and storing the blade correctly during off-season months, groundskeepers can extend blade life from a typical 50–80 hours of cut time to well over 150 hours without compromising cut quality. The final takeaway: do not treat the blade as a consumable to be ignored until failure. Treat it as the precision rotor it is, and your turf will show the difference.
Contact Us And Get A Quote
Priority To Learn About Our New Products
Copyright © 2025 Anhui Boxing Machinery Co., Ltd All Rights Reserved.China Custom Industrial-Grade Mower Blades Manufacturers
